...
A Linux distribution with Kernel 2.6 or greater.
Shared installations will require NFS version 4. See below for more details.
A volume with at least 20GB of disk space per codebase for large codebases.
At least 8GB of RAM.
A multi-core machine or a VM at least 2 VCPUs.
| Info |
|---|
These instructions are for CodeMRI® 1.24.60 and higher. For older versions see Setting up CodeMRI® Platform Web (pre-1.24.60) |
Deployment Flavors
Selecting a Deployment Flavor
...
Simple will provide the fastest way to get set up with CodeMRI® Platform Web, however it depends on everything running on a single machine.
Shared is ideal for integration with your build pipeline, and for teams that will need to share a single vault among multiple machines.
Feature | Simple | Shared |
|---|---|---|
Portfolio View | ✅ | ✅ |
Diagnostic View | ✅ | ✅ |
Build Pipeline Integration | ❌ | ✅ |
Vault Sharing | ❌ | ✅ |
Simple
A self-contained setup in which the server will be run from the same machine, whether physical or virtual, as the machine executing the scans. This is the best setup for evaluation or proof-of-concept installations where you want things to come up and running as fast as possible, and where you do not need to run CodeMRI® on continuous integration systems.
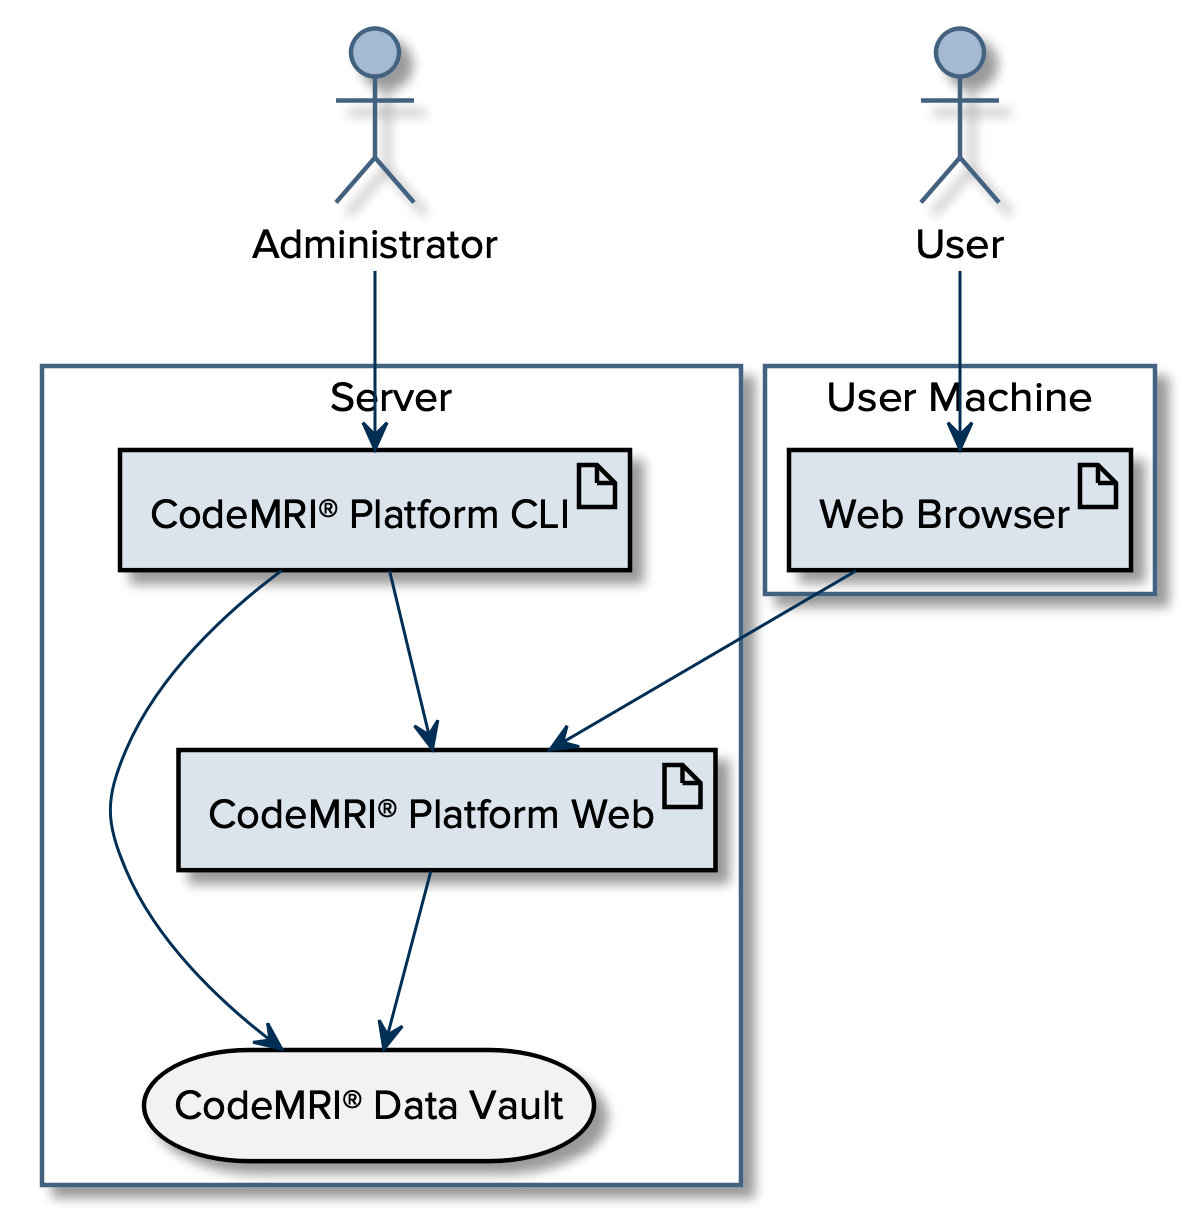
![]()
Simple Deployment Layout
...
A shared vault setup means that the machine running the server and the machine(s) running the scans (also known as "processors") are different. This is the best setup for integration with your build pipeline. In this case, the vault will be shared over NFS for use by processors.
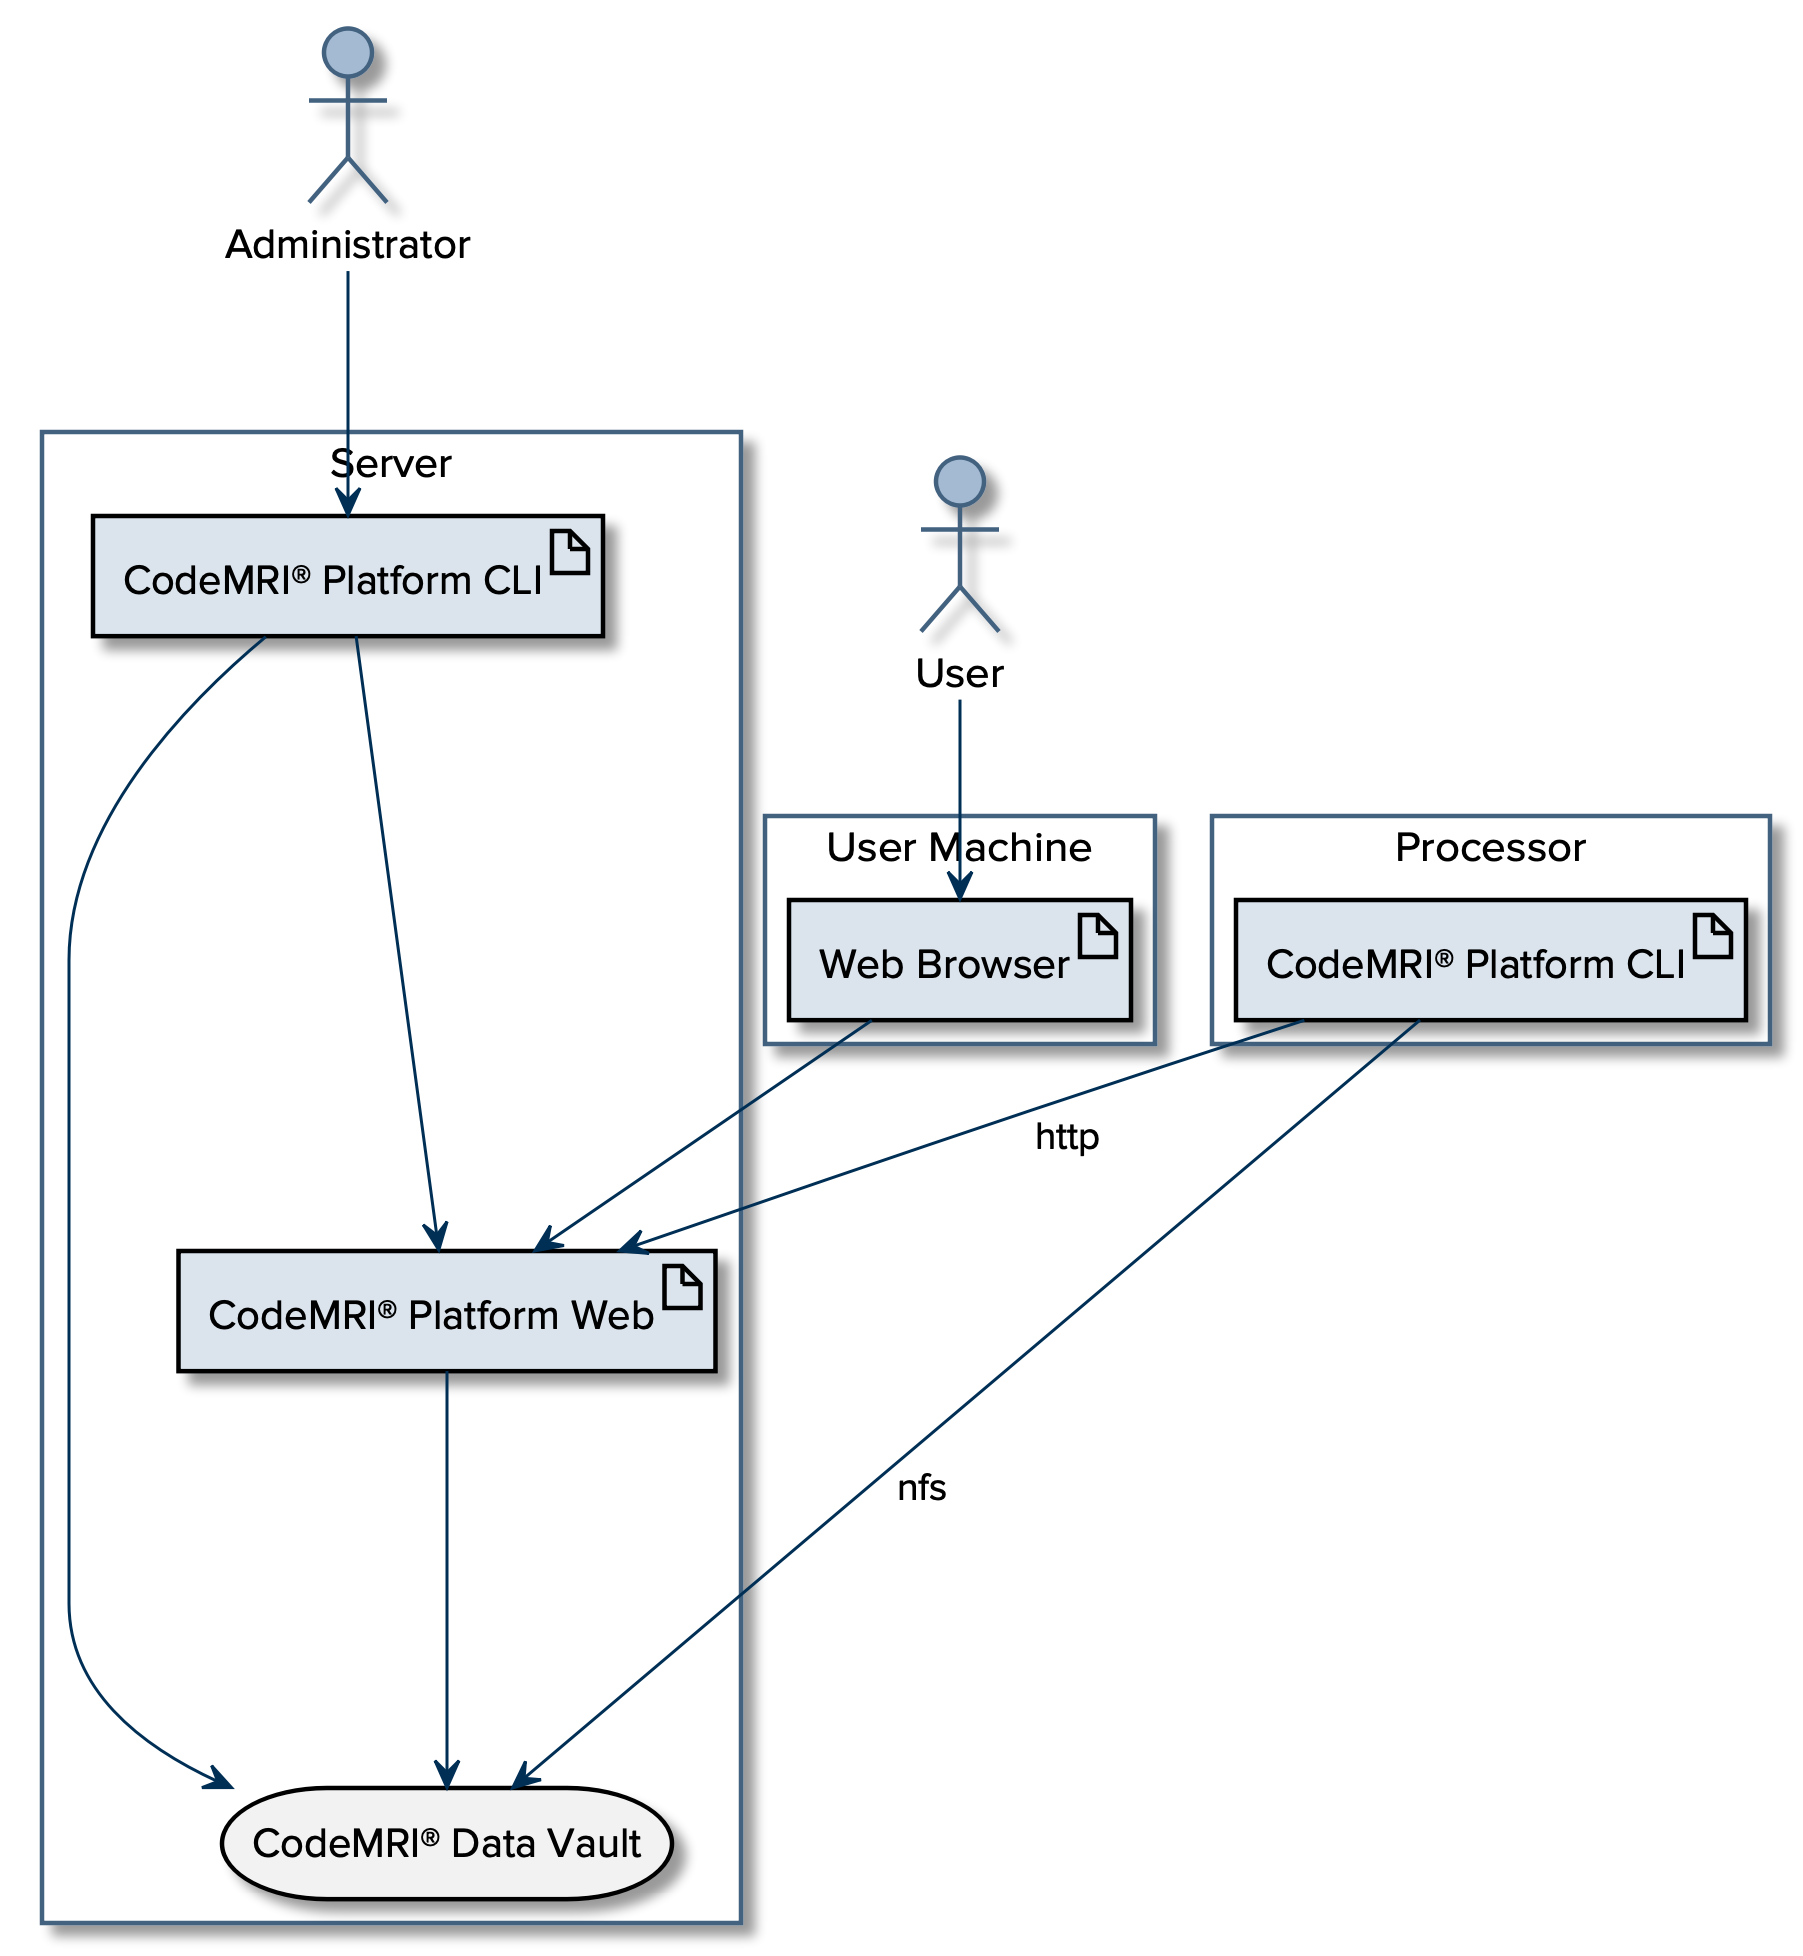
![]()
Shared Deployment Layout
...
Due to the complex nature of Silverthread’s analytics, you will need a partition with ample disk space for scans. For most installations we recommend a minimum disk size of 40GB. Here you will find a table of our recommendations based on codebase size:
Codebase Size | Space Required Per Scan |
|---|---|
Large Codebase (50,000 or more files) | 20GB |
Medium Codebase (10,000 to 50,000 files) | 5GB |
Small Codebase (< 10,000 files) | 1GB |
We highly recommend monitoring your disk space closely, especially in a continuous integration environment. If you believe you have an exceptional case (e.g. a codebase with millions of files), please contact support@silverthreadinc.com for guidance.
...
CodeMRI® Platform Installation
Step 1: Download and
...
install CodeMRI®
...
Download the archive
Download the “CodeMRI Platform for Linux” archive from https://www.codemri.com/installers (Account required). Unpack the archive on the target machine into a directory i.e., /srv/cmri:
...
Follow the instruction at /wiki/spaces/SCKB/pages/2828861441
Server Setup
Step 1: Set up a vault
Create a vault (if none exists):
| Code Block |
|---|
mkdir /desired/vault/location
cd /desired/vault/location
cmri vault create |
Step 2: Run the server setup script
...
You can run the platform setup script as local user.
...
:
| Code Block |
|---|
# cd /srv/cmri/server
# ./setup.sh |
After accepting the license agreement, the script will install the CodeMRI® Platform CLI.
To launch the CodeMRI Platform, runcmri from /srv/cmri/bin
...
Step 3: Select Deployment Type
| Code Block |
|---|
-Server Todeployments allowcome thein LOCALmultiple userflavors: to run* the "cmri" command outside of /srv/cmri/bin: - save the following entry in the local users .bashrc file: export PATH=/srv/cmri/bin:$PATH - To allow the ALL users to run the "cmri" command outside of /srv/cmri/bin: - create the file /etc/profile.d/99-codemri-platform.sh with the following content: export PATH=/srv/cmri/bin:$PATH |
Step 1: Run the server setup script:
| Info |
|---|
CMRI versions prior to 1.24.50 must run the setup script as root. |
| Code Block |
|---|
# cd /srv/cmri
# ./setup-server.sh |
Step 2: Select Deployment Type
| Code Block |
|---|
Server deployments come in multiple flavors:

* Type 'simple' for a self-contained setup. A self-contained setup means that server will be run from the same machine,
  whether physical or virtual, as the machine executing the scans. This is the best setup for evaluation or
  proof-of-concept installations where you want things to come up and running as fast as possible.

* Type 'shared' for a shared-vault setup. A shared vault setup means that the machine running the server and the
  machine(s) running the scans (also known as "processors") are different. This is the best setup for integration with
  Continuous Integration (CI). In this case, the vault will be shared over NFS for use by processors. Before beginning
  this process, you will need to ensure that your machine has NFS version 4 (NFSv4). This has been in the Linux kernel
  since 2.6, so any reasonably modern Linux distribution should have access to NFSv4.

* Type 'skip' to cancel server setup altogether. This machine will not be set up as a server. Use this if you are not
  interested in running the web-based application, or if this is a shared environment and you are setting up a worker
  machine.

Please enter an installation type.
simple |
Type simple and press Enter.
Step 3: Provide Vault Information
Vault Location
In order to use the server, a data vault is required. Please choose a volume with enough space according to the Capacity Planning section above.
| Code Block |
|---|
Please provide a path to either an existing vault, or a new vault to create.
|
Server User
Next, provide the user who will be running the CodeMRI® Platform Web server. The user must be a name of an existing user on your OS.
| Code Block |
|---|
What is the name of the user who will run the vault?
|
If you have provided an existing vault, the wizard will set the vault up to communicate with the server. If you specify a directory without a pre-existing vault, the wizard will prompt you to create a new vault. If there is a pre-existing vault, a new folder called web_data will be created and populated within that vault.
Step 4: Confirm Network Settings
Bind and Port Settings
The CodeMRI® Web server requires 2 ports:
One for the web site itself.
A second for the administrative interface.
The setup wizard will prompt you with the defaults:
| Code Block |
|---|
With default settings the server will bind to 0.0.0.0:8000, meaning port 8000 all interfaces.
A remote administration interface will also be provided on 0.0.0.0:9201 with a default username/password combination of admin/silverthread.
Would like like to change any of these values? (y/n)
|
You will need to customize these values if you are running other services on the machine that already use one or more of the default port numbers.
Once the automated installation is complete, proceed with the following instructions:
Create a vault (if none exists):
| Code Block |
|---|
mkdir /desired/vault/location
cd /desired/vault/location
cmri vault create |
Associate license (if not already associated) https://silverthread.atlassian.net/wiki/spaces/CKB/pages/2527789057/CodeMRI+-+Cheat+Sheet#Licensing
Create an endpoint to associate the vault with a web portal. Using the default settings (IP Address = 0.0.0.0, Port = 8000) if default settings were selected, or otherwise using the custom values for IP Address and Port, enter the following in a terminal:
| Code Block |
|---|
cd /srv/cmri/bin
cmri shell
vault config set analytics.endpoint 'http://<IP Address>:<Port>/analytics/v1'
exit |
Run a script to ensure the database is up-to-date, enter the following in a terminal:
| Code Block |
|---|
cd /srv/cmri/bin
cmri-server-init |
For the web-platform, it is HIGHLY recommended to perform the following (if not done in the previous platform setup):
| Code Block |
|---|
To allow the ALL users to run the "cmri" command outside of /srv/cmri/bin:
- create the file /etc/profile.d/99-codemri-platform.sh with the following content: export PATH=/srv/cmri/bin:$PATH |
That’s all. Once you have completed these steps, the server is set up and ready to be run. Please proceed to the Running and Administration section.
Shared Deployment Steps
Pre-Installation Checks
Before beginning this process, you will need to ensure that your machine has NFS version 4 (NFSv4). If you are unsure, you can check by running rpcinfo as shown below:
| Code Block |
|---|
$ rpcinfo -p localhost | grep 'nfs$'

100003    3   tcp   2049  nfs
100003    4   tcp   2049  nfs
100003    3   udp   2049  nfs
100003    4   udp   2049  nfs
|
If you see entries with 4 in the second column, you are running NFS version 4. If you do not see any entries, you may not be running NFS at all; follow your distribution’s guide for installing and running NFS.
Once you have the NFS service running, be sure you can access the NFS service from other machines on your network. While not a complete test by any means, you can do a simple smoke test on another machine using netcat:
| Code Block |
|---|
$ (nc -z <ip> 2049 && echo "nfs REACHABLE") || echo "nfs NOT REACHABLE"
$ (nc -z <ip> 111 && echo "rpc.d REACHABLE") && echo "rpc.d NOT REACHABLE" |
If you cannot reach NFS from other machines, make sure the service is running locally. You may need to change your firewall settings. If you use firewalld:
| Code Block |
|---|
$ sudo -i
# firewall-cmd --permanent --add-service=nfs
# firewall-cmd --permanent --add-service=mountd
# firewall-cmd --permanent --add-service=rpc-bind
# firewall-cmd --reload |
CodeMRI® Platform Installation
Step 1: Download and Extract CodeMRI® Platform
Download the archive
Download the “CodeMRI Platform for Linux” archive from https://www.codemri.com/installers (Account required). Unpack the archive on the target machine into /srv/cmri as root:
| Code Block |
|---|
# mkdir -p /srv/cmri
# cd /srv/cmri
# unzip /path/to/codemri-platform-linux-X.Y.Z.zip |
Step 2: Run the setup script
You must run the setup script as root.
| Code Block |
|---|
# cd /srv/cmri
# ./setup.sh |
Server Setup
Step 1: Run Setup Script
Once you have NFS up and running, and CodeMRI® installed, run setup-server.sh from the installation directory as root:
| Code Block |
|---|
$ sudo -i
# cd /srv/cmri
# ./setup-server.sh |
Step 2: Select Deployment Type
| Code Block |
|---|
Server deployments come in multiple flavors: * Type 'simple' for a self-contained setup. A self-contained setup means that server will be run from the same machine, whether physical or virtual, as the machine executing the scansType 'simple' for a self-contained setup. A self-contained setup means that server will be run from the same machine, whether physical or virtual, as the machine executing the scans. This is the best setup for evaluation or proof-of-concept installations where you want things to come up and running as fast as possible. * Type 'shared' for a shared-vault setup. A shared vault setup means that the machine running the server and the machine(s) running the scans (also known as "processors") are different. This is the best setup for integration with Continuous Integration (CI). In this case, the vault will be shared over NFS for use by processors. Before beginning this process, you will need to ensure that your machine has NFS version 4 (NFSv4). This has been in the Linux kernel since 2.6, so any reasonably modern Linux distribution should have access to NFSv4. * Type 'skip' to cancel server setup altogether. This machine will not be set up as a server. Use this if you are not interested in running the web-based application, or if this is a shared environment and you are setting up a worker machine. Please enter an installation type. simple |
Type simple and press Enter.
Step 4: Provide Vault Information
Vault Location
In order to use the server, a data vault is required. Please choose a volume with enough space according to the Capacity Planning section above.
| Code Block |
|---|
Please provide a path to either an existing vault, or a new vault to create.
|
Server User
Next, provide the user who will be running the CodeMRI® Platform Web server. The user must be a name of an existing user on your OS.
| Code Block |
|---|
What is the name of the user who will run the vault?
|
If you have provided an existing vault, the wizard will set the vault up to communicate with the server. If you specify a directory without a pre-existing vault, the wizard will prompt you to create a new vault. If there is a pre-existing vault, a new folder called web_data will be created and populated within that vault.
Step 5: Confirm Network Settings
Bind and Port Settings
The CodeMRI® Web server requires 2 ports:
One for the web site itself.
A second for the administrative interface.
The setup wizard will prompt you with the defaults:
| Code Block |
|---|
With default settings the server will bind to 0.0.0.0:8000, meaning port 8000 all interfaces.
A remote administration interface will also be provided on 0.0.0.0:9201 with a default username/password combination of admin/silverthread.
Would like like to change any of these values? (y/n)
|
You will need to customize these values if you are running other services on the machine that already use one or more of the default port numbers.
Once the automated installation is complete, proceed with the following instructions:
Create an endpoint to associate the vault with a web portal. Using the default settings (IP Address = 0.0.0.0, Port = 8000) if default settings were selected, or otherwise using the custom values for IP Address and Port, enter the following in a terminal:
| Code Block |
|---|
cd /srv/cmri/bin
cmri shell
vault config set analytics.endpoint 'http://<IP Address>:<Port>/analytics/v1'
exit |
Run a script to ensure the database is up-to-date, enter the following in a terminal:
| Code Block |
|---|
cd /srv/cmri/bin
cmri-server-init |
For the web-platform, it is HIGHLY recommended to perform the following (if not done in the previous platform setup):
| Code Block |
|---|
To allow the ALL users to run the "cmri" command outside of /srv/cmri/bin:
- create the file /etc/profile.d/99-codemri-platform.sh with the following content: export PATH=/srv/cmri/bin:/srv/cmri/server:$PATH |
That’s all. Once you have completed these steps, the server is set up and ready to be run. Please proceed to the Running and Administration section.
Shared Deployment Steps
Pre-Installation Checks
Before beginning this process, you will need to ensure that your machine has NFS version 4 (NFSv4). If you are unsure, you can check by running rpcinfo as shown below:
| Code Block |
|---|
$ rpcinfo -p localhost | grep 'nfs$'

100003    3   tcp   2049  nfs
100003    4   tcp   2049  nfs
100003    3   udp   2049  nfs
100003    4   udp   2049  nfs
|
If you see entries with 4 in the second column, you are running NFS version 4. If you do not see any entries, you may not be running NFS at all; follow your distribution’s guide for installing and running NFS.
Once you have the NFS service running, be sure you can access the NFS service from other machines on your network. While not a complete test by any means, you can do a simple smoke test on another machine using netcat:
| Code Block |
|---|
$ (nc -z <ip> 2049 && echo "nfs REACHABLE") || echo "nfs NOT REACHABLE"
$ (nc -z <ip> 111 && echo "rpc.d REACHABLE") && echo "rpc.d NOT REACHABLE" |
If you cannot reach NFS from other machines, make sure the service is running locally. You may need to change your firewall settings. If you use firewalld:
| Code Block |
|---|
$ sudo -i
# firewall-cmd --permanent --add-service=nfs
# firewall-cmd --permanent --add-service=mountd
# firewall-cmd --permanent --add-service=rpc-bind
# firewall-cmd --reload |
CodeMRI® Platform Installation
Step 1: Download and install CodeMRI®
Follow the instruction at /wiki/spaces/SCKB/pages/2828861441
Server Setup
Step 1: Set up a vault
Create a vault (if none exists):
| Code Block |
|---|
mkdir /desired/vault/location
cd /desired/vault/location
cmri vault create |
Step 2: Run the server setup script:
| Code Block |
|---|
# cd /srv/cmri/server
# ./setup.sh |
Step 3: Select Deployment Type
| Code Block |
|---|
Server deployments come in multiple flavors: * Type 'simple' for a self-contained setup. A self-contained setup means that server will be run from the same machine, whether physical or virtual, as the machine executing the scans. This is the best setup for evaluation or proof-of-concept installations where you want things to come up and running as fast as possible. * Type 'shared' for a shared-vault setup. A shared vault setup means that the machine running the server and the machine(s) running the scans (also known as "processors") are different. This is the best setup for evaluationintegration orwith proof-of-concept installations where you want things to come up and running as fast as possible. * Type 'shared' for a shared-vault setup. A shared vault setup means that the machine running the server and the machine(s) running the scans (also known as "processors") are different. This is the best setup for integration with Continuous Integration (CI). In this case, the vault will be shared over NFS for use by processors. Before beginning this process, you will need to ensure that your machine has NFS version 4 (NFSv4). This has been in the Linux kernel since 2.6, so any reasonably modern Linux distribution should have access to NFSv4. * Type 'skip' to cancel server setup altogether. This machine will not be set up as a server. Use this if you are not interested in running the web-based application, or if this is a shared environment and you are setting up a worker machine. Please enter an installation type. shared |
Type shared and press Enter.
Step 3: Provide User Information
| Code Block |
|---|
You will need a user to own the centralized vault. The default is user is "codemri" with a group of "codemri", but you may elect to use an existing user account.
If you elect the default choice, the user/group combination will be created. Would you like to use the defaults (y/n)? |
If you have already set up a designated CodeMRI® user on your server machine, you may elect to run the server as that user. Otherwise, you can accept the defaults and the wizard will create a codemri user along with a corresponding group. The codemri user has no home directory and is created as nologin for security purposes.
Step 4: Confirm Network Information
Port and Binding Address
The CodeMRI® Web server requires 2 ports:
One for the web site itself.
A second for the administrative interface.
The setup wizard will prompt you with the defaults:
| Code Block |
|---|
With default settings the server will bind to 0.0.0.0:8000, meaning port 8000 all interfaces.
A remote administration interface will also be provided on 0.0.0.0:9201 with a default username/password combination of admin/silverthread.
Would like like to change any of these values? (y/n)
|
You may need to customize the default values if you are running any other services on the machine.
LAN IP Address
In order to reach the server, other machines connecting to the vault will read an IP address or hostname from the vault:
| Code Block |
|---|
We have automatically detected your machine's LAN IP address as 192.168.50.54. Is this address not reachable from other machines or would you like to provide a different address or hostname (y/n)?
|
Other machines connecting to the centralized vault will need to know how to reach the machine the server is running on. Ensure the automatically detected value is correct. If not, type y, press Enter, and provide the correct IP or hostname.
Step 5: Provide Vault Information
Vault Information
| Code Block |
|---|
Please provide a path to either an exisiting vault, or a new vault to create.
Be sure to choose a disk with at least 20GB of space per codebase to scan.
If the vault directory does not exist, it will be created.
|
Enter the path to the vault (e.g. /usr/share/vault). Be sure to choose a location with plenty of space, see the Capacity Planning section above for details.
If a vault is not present, the wizard will walk you through the process of creating the vault. Be sure to answer y to the following prompt:
| Code Block |
|---|
Would you like to create a vault here? (y/n) |
Enter your contact information as prompted, then the vault will be created and set up.
Step 6: Share Setup
Finally, the wizard will prompt you about network share information:
| Code Block |
|---|
We need to set up NFS in order to share the centralized vault to other hosts. This comes with a set of defaults optimized for a trusted network that will work on most setups by default:

* Export vault directory to any IP address.
* all_squash,anonuid=1000,anongid=1000; meaning that any user accessing the share will be mapped to the owner of the vault. This removes the need to handle UID/GID synchronization.
* rw, anyone will have both read and write access to the share.

If you want to use the default NFS settings, type "auto".
If you want to use a different sharing technology (e.g. Samba for sharing with Windows machines) or customize the NFS setup, type "manual". Note that electing this means that you will need to manually set up the share. |
If the default settings are acceptable, type auto.
If you need to set up another network sharing technology, or if your organization has stricter security requirements you will need to set up the share manually. Type manual, and proceed to manually set up your network share.
If you have selected auto, the wizard will give you a line to paste into the /etc/fstab of machines you would like to have access to the vault:
| Code Block |
|---|
192.168.50.54:/usr/share/cmri-vault /path/to/mount/point nfs defaults,user 0 0
|
Be sure to create the mount point as root via mkdir -p before attempting to mount the NFS share.
Once the automated installation is complete, proceed with the following instructions:
Create an endpoint to associate the vault with a web portal. Using the default settings (IP Address = 0.0.0.0, Port = 8000) if default settings were selected, or otherwise using the custom values for IP Address and Port, enter the following in a terminal:
| Code Block |
|---|
cd /srv/cmri/bin
cmri shell
vault config set analytics.endpoint 'http://<IP Address>:<Port>/analytics/v1'
exit |
Run a script to ensure the database is up-to-date, enter the following in a terminal:
| Code Block |
|---|
cd /srv/cmri/bin cmri-server-initContinuous Integration (CI). In this case, the vault will be shared over NFS for use by processors. Before beginning this process, you will need to ensure that your machine has NFS version 4 (NFSv4). This has been in the Linux kernel since 2.6, so any reasonably modern Linux distribution should have access to NFSv4. * Type 'skip' to cancel server setup altogether. This machine will not be set up as a server. Use this if you are not interested in running the web-based application, or if this is a shared environment and you are setting up a worker machine. Please enter an installation type. shared |
Type shared and press Enter.
Step 4: Provide User Information
| Code Block |
|---|
You will need a user to own the centralized vault. The default is user is "codemri" with a group of "codemri", but you may elect to use an existing user account.
If you elect the default choice, the user/group combination will be created. Would you like to use the defaults (y/n)? |
If you have already set up a designated CodeMRI® user on your server machine, you may elect to run the server as that user. Otherwise, you can accept the defaults and the wizard will create a codemri user along with a corresponding group. The codemri user has no home directory and is created as nologin for security purposes.
Step 5: Confirm Network Information
Port and Binding Address
The CodeMRI® Web server requires 2 ports:
One for the web site itself.
A second for the administrative interface.
The setup wizard will prompt you with the defaults:
| Code Block |
|---|
With default settings the server will bind to 0.0.0.0:8000, meaning port 8000 all interfaces.
A remote administration interface will also be provided on 0.0.0.0:9201 with a default username/password combination of admin/silverthread.
Would like like to change any of these values? (y/n)
|
You may need to customize the default values if you are running any other services on the machine.
LAN IP Address
In order to reach the server, other machines connecting to the vault will read an IP address or hostname from the vault:
| Code Block |
|---|
We have automatically detected your machine's LAN IP address as 192.168.50.54. Is this address not reachable from other machines or would you like to provide a different address or hostname (y/n)?
|
Other machines connecting to the centralized vault will need to know how to reach the machine the server is running on. Ensure the automatically detected value is correct. If not, type y, press Enter, and provide the correct IP or hostname.
Step 6: Provide Vault Information
Vault Information
| Code Block |
|---|
Please provide a path to either an exisiting vault, or a new vault to create.
Be sure to choose a disk with at least 20GB of space per codebase to scan.
If the vault directory does not exist, it will be created.
|
Enter the path to the vault (e.g. /usr/share/vault). Be sure to choose a location with plenty of space, see the Capacity Planning section above for details.
If a vault is not present, the wizard will walk you through the process of creating the vault. Be sure to answer y to the following prompt:
| Code Block |
|---|
Would you like to create a vault here? (y/n) |
Enter your contact information as prompted, then the vault will be created and set up.
Step 7: Share Setup
Finally, the wizard will prompt you about network share information:
| Code Block |
|---|
We need to set up NFS in order to share the centralized vault to other hosts. This comes with a set of defaults optimized for a trusted network that will work on most setups by default:

* Export vault directory to any IP address.
* all_squash,anonuid=1000,anongid=1000; meaning that any user accessing the share will be mapped to the owner of the vault. This removes the need to handle UID/GID synchronization.
* rw, anyone will have both read and write access to the share.

If you want to use the default NFS settings, type "auto".
If you want to use a different sharing technology (e.g. Samba for sharing with Windows machines) or customize the NFS setup, type "manual". Note that electing this means that you will need to manually set up the share. |
If the default settings are acceptable, type auto.
If you need to set up another network sharing technology, or if your organization has stricter security requirements you will need to set up the share manually. Type manual, and proceed to manually set up your network share.
If you have selected auto, the wizard will give you a line to paste into the /etc/fstab of machines you would like to have access to the vault:
| Code Block |
|---|
192.168.50.54:/usr/share/cmri-vault /path/to/mount/point nfs defaults,user 0 0
|
Be sure to create the mount point as root via mkdir -p before attempting to mount the NFS share.
For the web-platform, it is HIGHLY recommended to perform the following (if not done in the previous platform setup):
| Code Block |
|---|
To allow the ALL users to run the "cmri" command outside of /srv/cmri/bin:
- create the file /etc/profile.d/99-codemri-platform.sh with the following content: export PATH=/srv/cmri/bin:/srv/cmri/server:$PATH |
Please proceed to the Running and Administration section for further instructions.
...
To start the server, run cmri-start-server-start.sh. This command will setuid to the provided server user before running the server, so if you run this command as root, it will not run the server as root. The server is run in the background as a daemon; it will not exit after you exit the shell. navigate to http://server-ip-here:8000 to access the server. Default is 0.0.0.0:8000
To stop the server, run cmri-stop-server-stop.sh.
Administrative Interface
...
| Code Block |
|---|
$ cd /srv/vault $ cmri account login |
Enter your http://CodeMRI.com login credentials to authenticate your vault.
...
If you have already been using CodeMRI CodeMRI® to generate Excel reports or access data via command line, you have probably been running the following command to generate data in the Data Vault and generate Excel:
...
Like with any computer software, things on occasion don’t always do what you want them to do. Here are some common issues you may face and solutions to these problems:
Issue | Likely Cause | Resolution | ||
|---|---|---|---|---|
Server running, can access website locally, cannot access from other machines. | Your system firewall is blocking the ports the server is exposed on. | This assumes default settings, if you have customized your ports, replace If you are running
After completing the command sequence above, check that the service is accessible from other machines. If you are using another firewall technology, consult the user manual for your firewall. | ||
export_web_data completes, scan does not show up in portfolio. | The background worker process has stopped running. | Access the admin panel at Restarting the services and then refreshing the server page can work as well. If the worker is running, check the logs. It may be processing another import, or encountered an error processing the system you’ve exported. Contact support@silverthreadinc.com for assistance with errors. |